Optimizing Dockerfiles for Fast Builds
Optimize Dockerfile definition for speeding up container builds and reducing image sizes
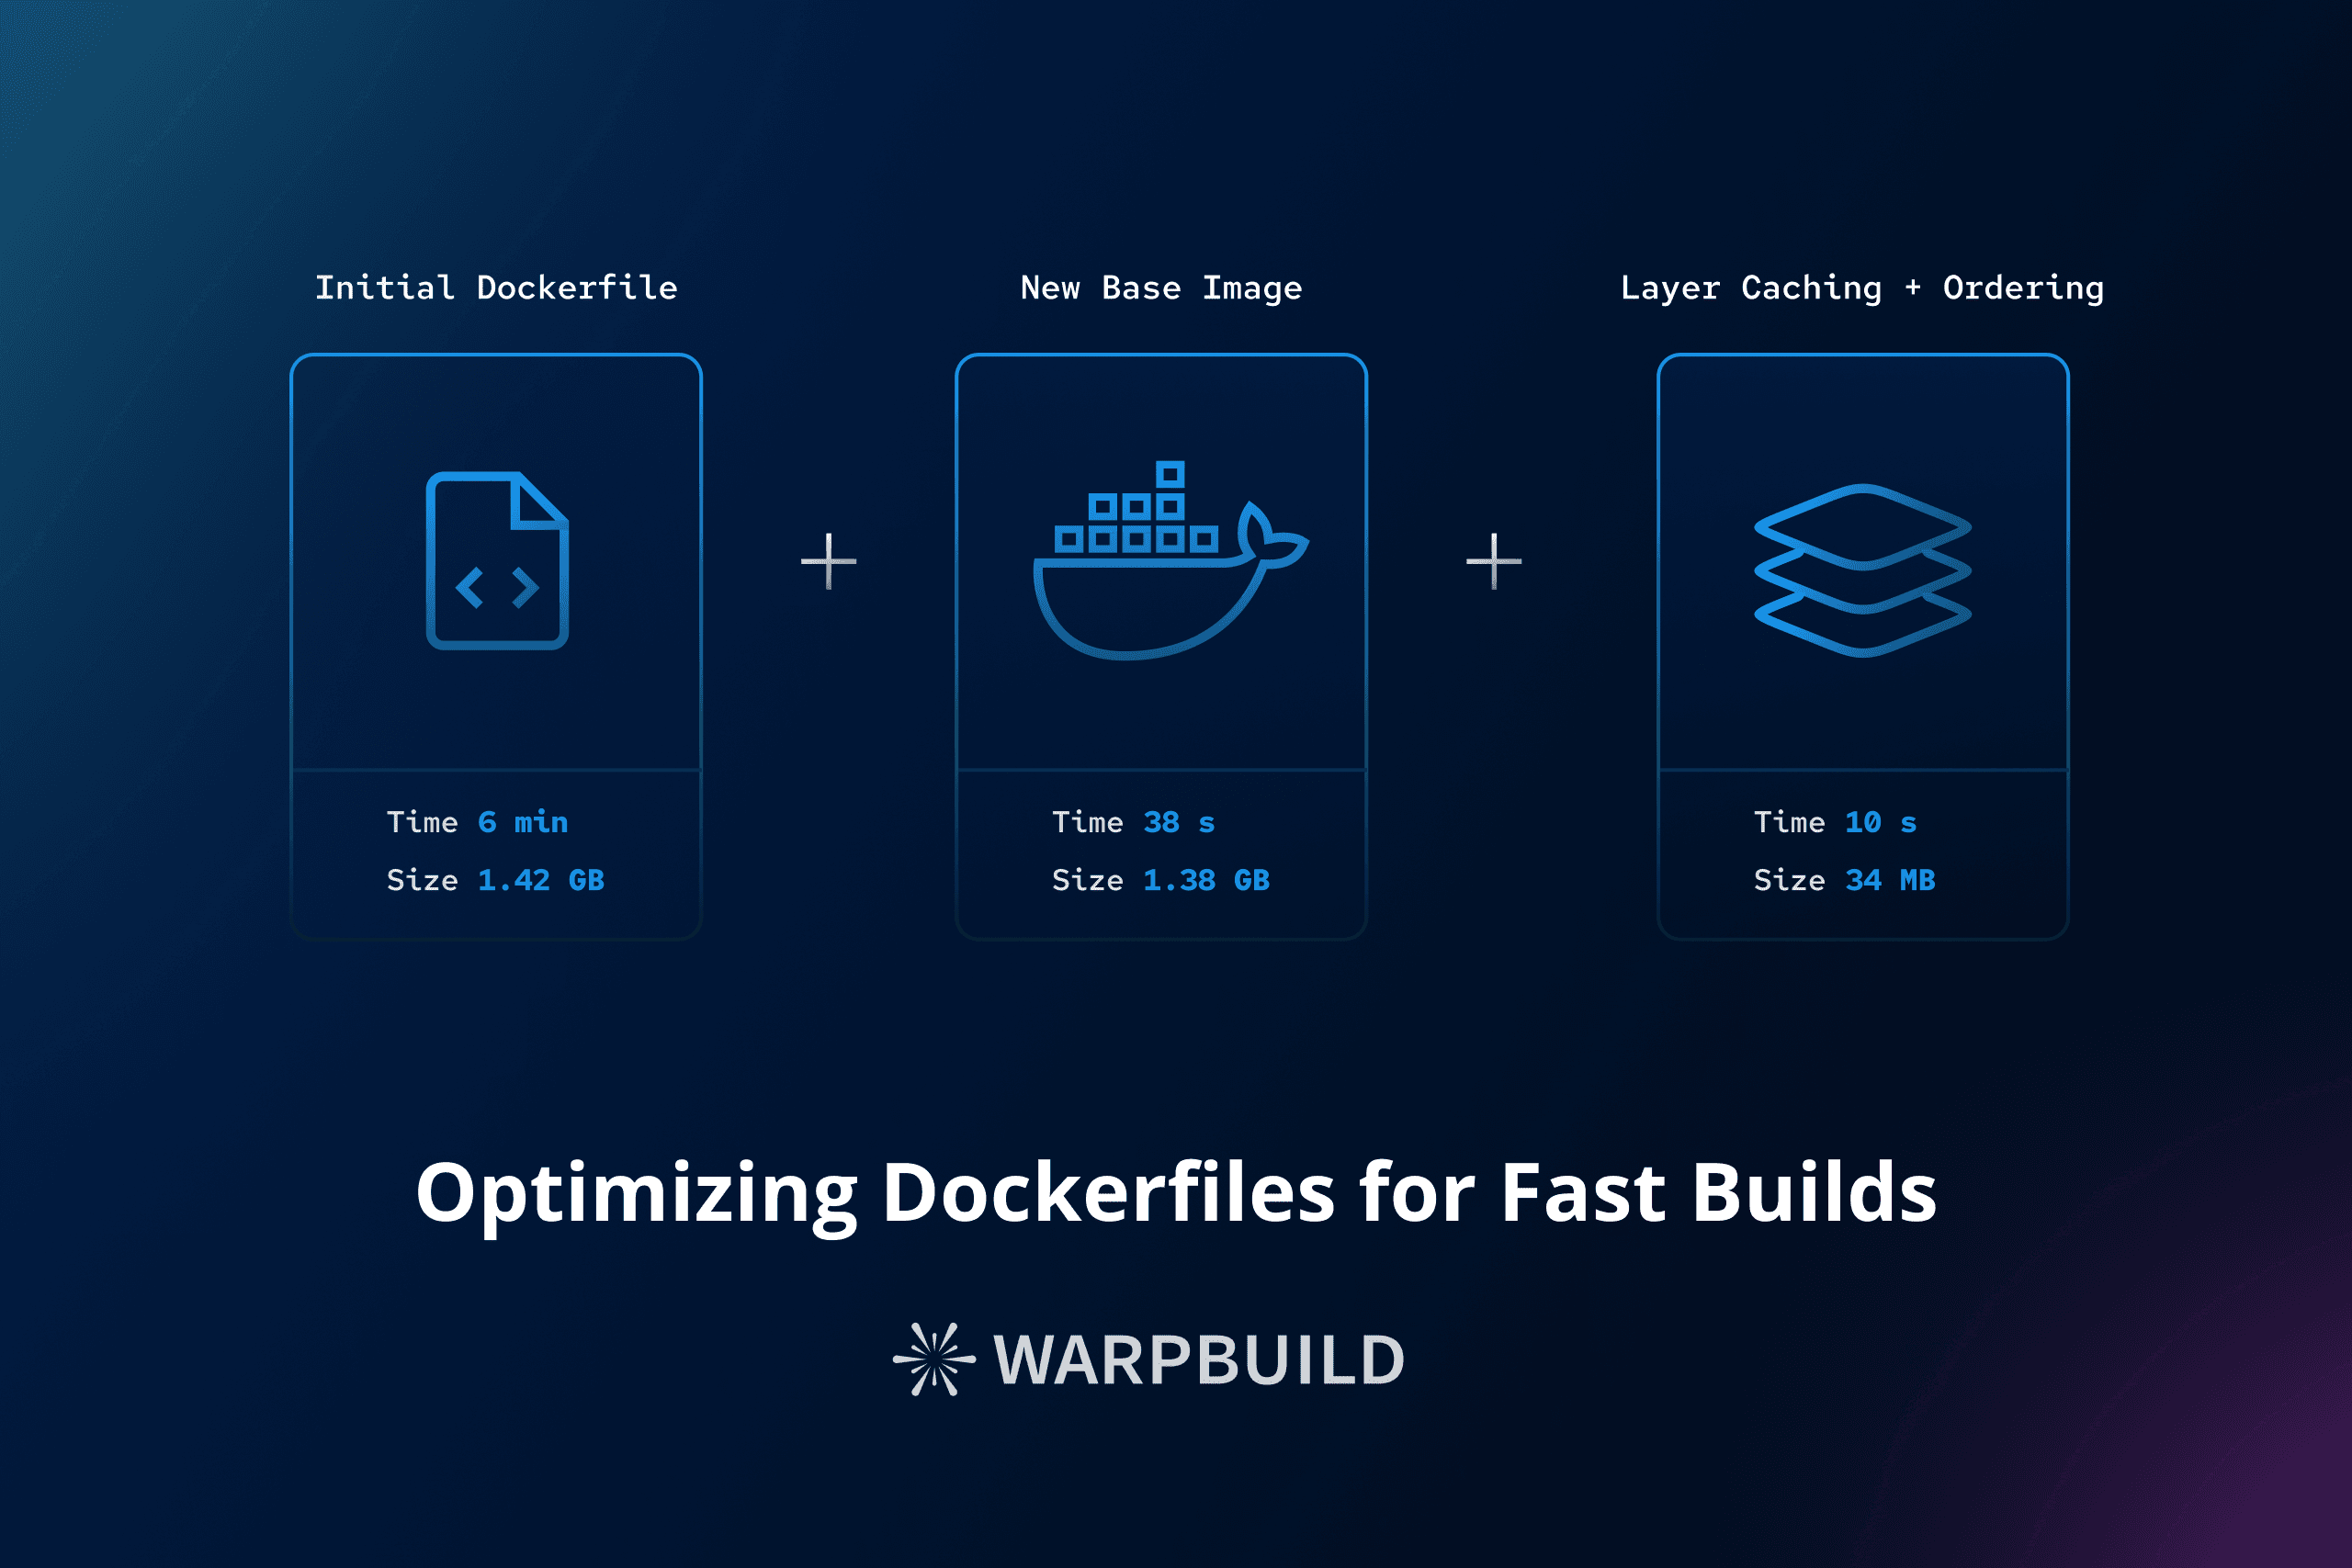
In this post, we will create a Dockerfile starting with a naive definition and incrementally improve it with well-established best practices used across the industry for illustrating the optimization that can be achieved in build time, and container size.
Note
The project that we are going to build today is a simple backend server written in Go. We need to create a binary of our server. Additionally, the binary requires zstd(z-standard compression algorithm) to be present on the system.
The code for the project is available at https://github.com/WarpBuilds/docker-build-optimization-example-project/blob/main/Dockerfile
The processes and steps described here are not language or framework specific. They can be adapted to any project.
A note on terminology
While container images originated in Docker, the company, they have become a standard way of packaging applications and running them in a portable manner. The specification for generating container images is now maintained by the Open Container Initiative (OCI), which is a part of the Linux Foundation.
Writing a Dockerfile is the most common way to build an OCI compliant image. Colloquially, docker images and OCI images are used interchangeably.
Initial Dockerfile
Our first target is to write a Dockerfile that can build our code and get the server up and running.
# The base image.
FROM ubuntu:22.04

# Sets the working directory for any instructions that follow it.
WORKDIR /build

# Copies all the files from the current directory and
# adds them to the filesystem of the container.
COPY . .

# Upgrades all the installed packages using Ubuntu's package manager.
RUN apt update -y
RUN apt upgrade -y

# The default ubuntu image doesn't validate proxy.golang.org as CA,
# so we need to manually add it.
RUN apt install golang-go ca-certificates openssl -y
ARG cert_location=/usr/local/share/ca-certificates
RUN openssl s_client -showcerts -connect proxy.golang.org:443 </dev/null 2>/dev/null|openssl x509 -outform PEM >  ${cert_location}/proxy.golang.crt
RUN update-ca-certificates

# Installs Z-standard
RUN apt install zstd -y

# Verify Z-standard installation
RUN zstd --version

# Downloads dependencies of our project
RUN go mod download

# Builds the go binary
ENV CGO_ENABLED=0 GOOS=linux GOARCH=amd64
RUN go build -ldflags="-s -w" -o apiserver .

# Exposes port used by our backend server
EXPOSE 8080

# Runs the backend server
RUN chmod +x apiserver
ENTRYPOINT ["./apiserver"]
Build Time: 352.9s
Final image size: 1.42GB
An image is built from a Dockerfile using docker build . command. Running the build takes our system around 6 minutes and the final image size is 1.42GB.
Note
All the benchmarks are done on an Macbook Air M1 with 16GB RAM.
Waiting 6 minutes for every build is a really bad experience. Additionally, if the image is not cached, downloading a 1.42GB image will impact the startup time of our container. So, let's address these issues.
First, we will focus on optimizing our build time. Once that is done, we will address the issue of image size.
Base Image
For our first improvement, we can start using the GoLang image as our base image, which already contains GoLang SDK and correct CA certificate configuration.
# Changes to golang image
FROM golang:1.21

WORKDIR /build

COPY . .

RUN apt update -y
RUN apt upgrade -y

RUN apt install zstd -y
RUN zstd --version

RUN go mod download

ENV CGO_ENABLED=0 GOOS=linux GOARCH=amd64
RUN go build -ldflags="-s -w" -o apiserver .

ENTRYPOINT ["/apiserver"]
Build Time: 38.5s
Final image size: 1.38GB
As you would have noticed, this has already reduced our build time quite significantly. The image size is reduced by a little bit as well.
Layer Caching
Docker uses the concepts of layers while building images. Each layer contains the filesystem changes to the image for the state before and after the execution an instruction. In our tests above, you would have noticed that the benchmarks deliberately delete all the cache. This is done so that we can notice the difference it makes when we do start using layer caching.
Note
Layer caching is enabled by default.
If we build the Dockerfile above again, this time with layer caching, we can see that it takes us around 24s compared to the 38s it took us before.
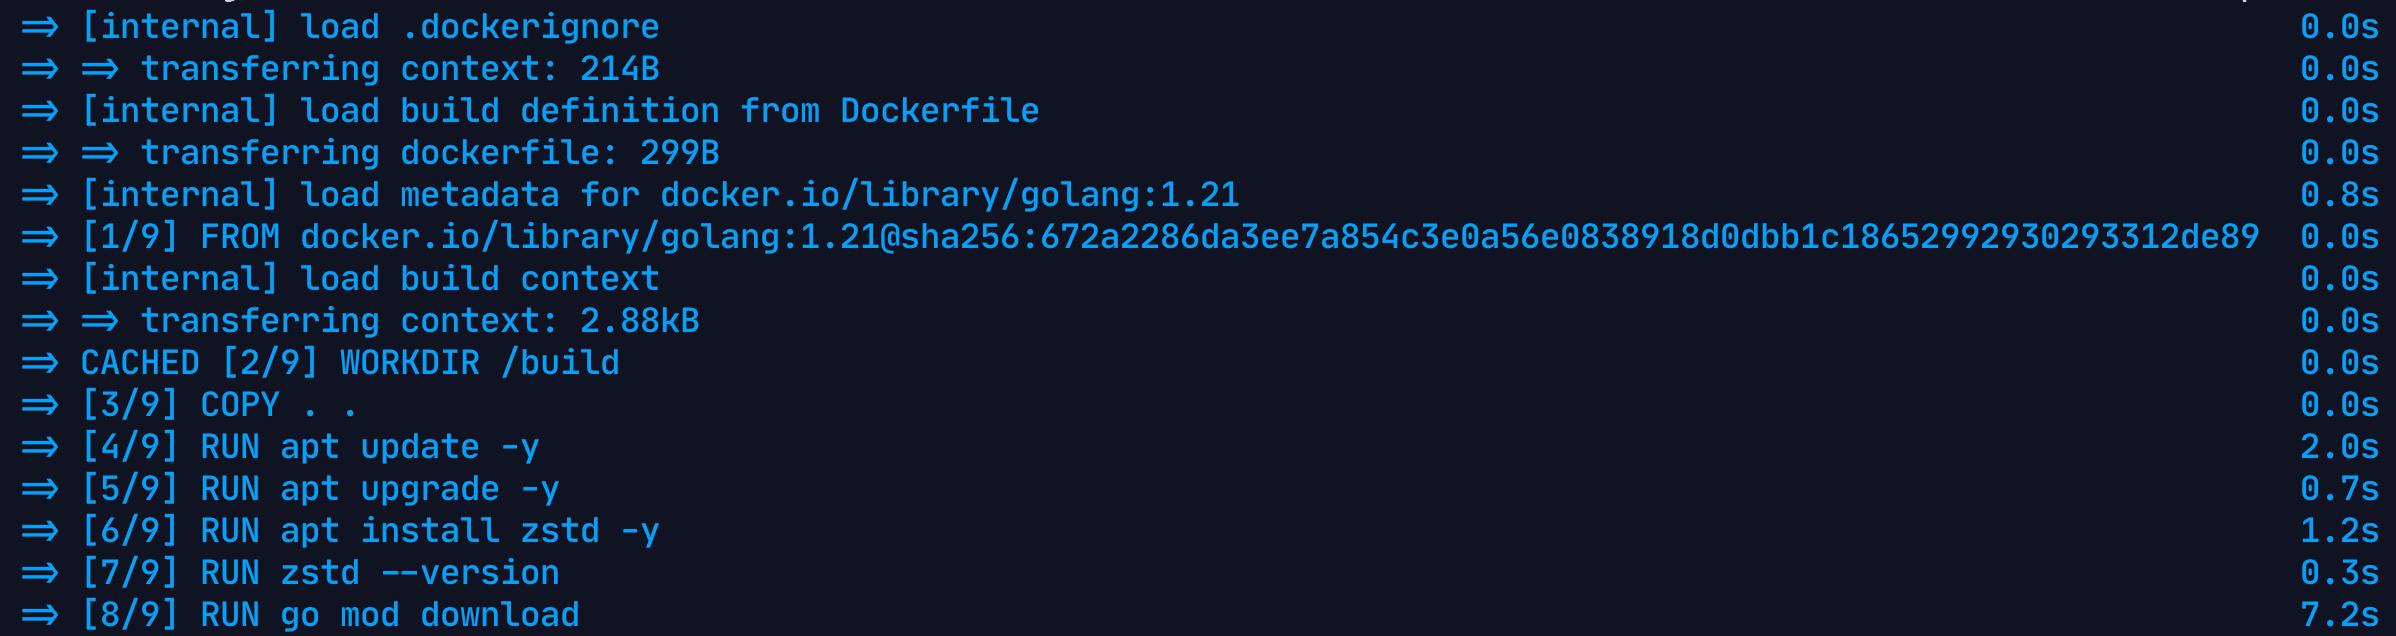

Build Time: 24.7s
Final image size: 1.38GB
Layer Ordering
Docker caches every layer it creates. Whenever it encounters a layer that is changed, all the layer caches of the downstream layers are invalidated and built again. In our current Dockerfile, you would notice that every time any file changes, the COPY . . layer is invalidated and this causes all of the downstream steps to be built again.
Let's first introduce a .dockerignore file, so that any changes to env files, .git folder etc. don't invalidate our cache.
# Files
.dockerignore
.editorconfig
.gitignore
.env.*
Dockerfile
Makefile
LICENSE
**/*.md
**/*_test.go
*.out

# Folders
.git/
.github/
build/
As we are already aware, that the changes in any layer result in caches being invalidated of all the downstream layers. So, we should always try to order our Dockerfiles from the least changing instructions at the top to the most changing instructions at the bottom.
For our project, we can move our dependency installation steps above our copy step.
FROM golang:1.21

WORKDIR /build

RUN apt update -y
RUN apt upgrade -y

RUN apt install zstd -y
RUN zstd --version

COPY . .

RUN go mod download

ENV CGO_ENABLED=0 GOOS=linux GOARCH=amd64
RUN go build -ldflags="-s -w" -o apiserver .

ENTRYPOINT ["/apiserver"]
Build Time: 17.9s
Final image size: 1.38GB
This reduces our cached build time to 18s. We can optimise this further by only copying files required by dependency installer first i.e. go.mod and go.sum for Go projects. This will make sure that even if our code changes, our dependency installs are cached.
FROM golang:1.21

WORKDIR /build

RUN apt update -y
RUN apt upgrade -y

RUN apt install zstd -y
RUN zstd --version

COPY go.mod go.sum ./
RUN go mod download

COPY . .

ENV CGO_ENABLED=0 GOOS=linux GOARCH=amd64
RUN go build -ldflags="-s -w" -o apiserver .

ENTRYPOINT ["/apiserver"]
Build Time:
 10.7s
Final image size: 1.38GB
This reduces our build time to 10.7s.
We started with a build time of around 6 minutes and have reached 10 seconds but our image size is still quite huge. Every time our image changes, our container would have to download the new image which will affect its startup time. Let's optimize that as well.
Image Size
First step to reduce our image size is to reduce our layers. Every layer that we introduce to our image increases its size. To reduce layers, we can bunch up our run statements together.
FROM golang:1.21

WORKDIR /build

RUN apt update -y && apt upgrade -y && apt install zstd -y && zstd --version

COPY go.mod go.sum ./
RUN go mod download

COPY . .

ENV CGO_ENABLED=0 GOOS=linux GOARCH=amd64
RUN go build -ldflags="-s -w" -o apiserver .

ENTRYPOINT ["/apiserver"]
Although, in our case it will not have a large effect as we didn't have many layers to begin with.
Multi-Stage Builds
We use golang:1.21 as our base image which is built on top of debian. It contains various packages and dependencies which we do not need. GoLang's build process generates a binary which can run on various systems even without GoLang SDKs installed. Let's address this by introducing another important concept in Docker known as Multi Stage Build.
# Build stage
FROM golang:1.21 AS builder

WORKDIR /build

COPY go.mod go.sum ./
RUN go mod download

COPY . .

ENV CGO_ENABLED=0 GOOS=linux GOARCH=amd64
RUN go build -ldflags="-s -w" -o apiserver .

# Runtime stage
FROM alpine:3.19

COPY --from=builder ["/build/apiserver", "/"]

# Uses alpine's package manager to install zstd
RUN apk add zstd && zstd --version

ENTRYPOINT ["/apiserver"]
Build Time: 10.3s
Final image size: 34MB
We have now changed our Dockerfile to contain two stages. In the first build stage, we use golang:1.21 base image to build our go source code and get a binary as output. We copy the binary to our runtime stage which uses alpine:3.19 as its base. Alpine is a very lightweight linux distro suitable for creating light weight runtime images. We have also added zstd in our alpine base image as the binary requires it in runtime.
The final size of our image is 34MB. Our build time is also reduced by some milliseconds as Docker tries to run these stages in parallel, until it hits a dependency to output of another stage.
Note
Here we are assuming that our binary requires zstd to be installed on the system. If that was not the case, then we could have used the scratch base image which would have reduced our final image size to 25.7MB.
FROM golang:1.21 AS builder

WORKDIR /build

COPY go.mod go.sum ./
RUN go mod download

COPY . .

ENV CGO_ENABLED=0 GOOS=linux GOARCH=amd64
RUN go build -ldflags="-s -w" -o apiserver .

FROM scratch

COPY --from=builder ["/build/apiserver", "/"]

# RUN apk add zstd && zstd --version

ENTRYPOINT ["/apiserver"]
CI Builds
All the concepts that we have talked about here are also applicable to building a docker image on CI systems. Let's see how we can run the docker build on GitHub CI with layer caching enabled.
name: Build Docker Image

on:
  push:
    branches:
      - "main"

jobs:
  docker:
    runs-on: ubuntu-latest
    steps:
      - name: Set up QEMU
        uses: docker/setup-qemu-action@v3
      - name: Set up Docker Buildx
        uses: docker/setup-buildx-action@v3
      - name: Build and push
        uses: docker/build-push-action@v5
        with:
          push: false
					# We are using GitHub's backend as the cache storage here. More info:
					# https://docs.docker.com/build/ci/github-actions/cache/#github-cache
          cache-from: type=gha
          cache-to: type=gha,mode=max
It takes us 2m6s to build this for the first time without using cache. Using cache reduces the build time to 1m38s.
🚀 Use WarpBuild Runners
If you want to optimize your build times even further, you can use WarpBuild's runners. The same workflow, on a similar system to ubuntu-latest, finishes in 55s. See the results for yourself here https://github.com/WarpBuilds/docker-build-optimization-example-project/actions/runs/7326651267/job/19952582967
Using WarpBuild Runners is as easy as replacing a line in your GitHub workflow file.
- runs-on: ubuntu-latest
+ runs-on: warp-ubuntu-latest-x64-2x
Build Optimization Reference
| Optimization Step | Build Time (seconds) | Image Size (GB) |
|---|---|---|
| Initial | 352.9 | 1.42 |
| Specific Image selection | 38.5 | 1.38 |
| Use caching | 24.4 | 1.38 |
| Layer ordering | 17.9 | 1.38 |
| Order file copying step | 10.7 | 1.38 |
| Multi-stage builds | 10.3 | 0.034 (34MB) |
Conclusion
In this post, we have seen how we can optimize our Dockerfiles for faster builds and smaller image sizes. We have also seen how we can use WarpBuild Runners to further optimize our build times.
This post focused on optimizing the definition of the Dockerfile and is foundational to optimizing the build times and image sizes. In the future, we will look at optimizing the build process itself through container layer caching in CI systems and alternate build systems like Bazel.
Last updated on
WarpBuild's Observability Architecture
How WarpBuild built a zero-maintenance observability system using S3, presigned URLs, and OpenTelemetry - achieving infinite scalability with minimal infrastructure.
Optimizing Self-Hosted GitHub Actions Runner Costs
Checklist of strategies to cut self-hosted GitHub Actions costs with networking, caching, autoscaling, and compliance-friendly patterns.